



Building your first desktop personal computer (PC) is one of the most rewarding projects a tech enthusiast, gamer, or professional can undertake. Beyond saving money compared to pre-built systems, constructing your own rig gives you total control over component selection, future upgradeability, and thermal performance. While staring at a table full of static-sensitive electronics can feel intimidating at first, modern PC assembly is remarkably modular. Components are designed with standardized keys and single-direction fits, making physical installation as straightforward as assembling a high-tech puzzle.
Phase 1: Essential Components and Preparation
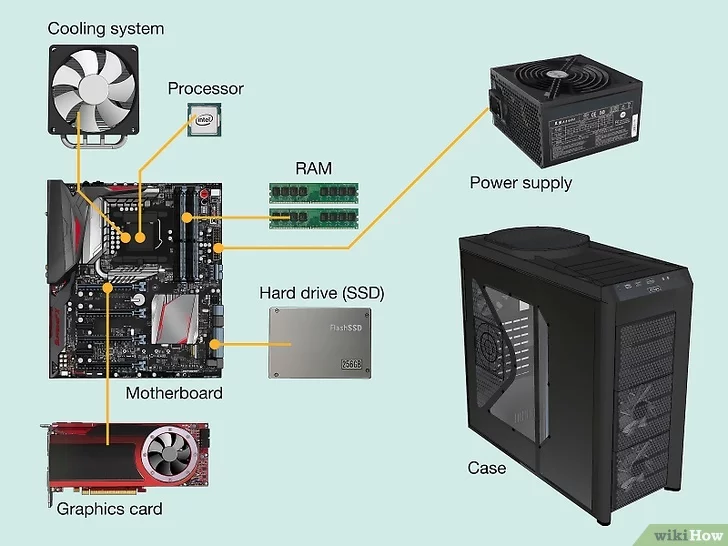
Before turning a single screw, you must gather the essential hardware components and create a static-free workspace. A standard desktop build requires seven primary hardware parts:
- Central Processing Unit (CPU): The central brain executing all system calculations.
- Motherboard: The primary circuit board connecting all hardware modules.
- Random Access Memory (RAM): High-speed temporary memory for active system tasks.
- Storage (NVMe SSD): Non-volatile solid-state storage for your operating system and files.
- Graphics Processing Unit (GPU): Dedicated processor handling visual rendering and heavy graphical workloads.
- Power Supply Unit (PSU): Converts wall AC electricity to clean DC power for all components.
- PC Case (Chassis): The enclosure housing and cooling your hardware setup.
In addition to your components, clear a large, non-carpeted wooden table and keep a magnetic Phillips #2 screwdriver nearby. Building on a hard surface minimizes static electricity build-up, protecting sensitive silicon chips during installation.
Phase 2: Assembly Step-by-Step
Step 1: Install the CPU on the Motherboard

It is always easiest to install the CPU, RAM, and M.2 SSD onto the motherboard before mounting it inside the case.
- Unbox the motherboard and place it on top of its cardboard packaging box.
- Open the CPU socket by lifting the metal retention lever.
- Align the golden triangle indicator on the corner of the processor with the matching arrow on the motherboard socket.
- Gently drop the CPU straight down into the socket without applying force.
- Lower the retention arm and latch it back under the catch tab.
Step 2: Install Memory (RAM) and NVMe Storage
Next, snap the RAM modules and M.2 NVMe solid-state drive into place.
- Open the plastic retention clips on the RAM slots (typically slots 2 and 4 for dual-channel speed).
- Align the notch on the bottom edge of the RAM stick with the ridge in the slot.
- Press down firmly on both ends of the RAM module until the side latches click shut automatically.
- Remove the M.2 slot heatsink on the motherboard, insert the M.2 SSD at a 30-degree angle, press it flat, and secure it with the provided small screw or latch.
Step 3: Mount the CPU Cooler
Position the CPU cooler over the processor. If your cooler does not come with pre-applied thermal paste, apply a pea-sized dot of thermal paste directly in the center of the CPU lid. Fasten the cooler retention bracket down in an alternating cross pattern to ensure even pressure across the processor die. Plugin the cooler’s fan cable into the motherboard header labeled CPU_FAN.
Step 4: Prepare the Case and Install the Power Supply (PSU)
Unbox your computer case and remove the tempered glass side panels.
- Slide the Power Supply Unit into its bottom bay with the cooling fan facing downward toward the case’s dust filter.
- Secure the PSU to the back of the case using four standard chassis screws.
- Route the primary power cables—the 24-pin motherboard cable, 8-pin CPU cable, and PCIe power cables—through the case’s rear cable management grommets.
Step 5: Mount the Motherboard and GPU
Install the metal I/O shield into the rear chassis opening if your motherboard does not have an integrated shield. Next, carefully align the motherboard mounting holes with the brass standoffs pre-installed in the case chassis.
- Fasten the motherboard using the provided screws without over-tightening.
- Connect the 24-pin main power and 8-pin CPU power cables firmly until their plastic clips snap into place.
- Remove the upper PCIe expansion slot covers on the rear of the case.
- Push the Graphics Card (GPU) straight into the top PCIe x16 slot until the slot clip clicks. Secure the GPU bracket to the case chassis with thumb screws and attach the required PCIe power cables from the PSU.
Phase 3: Cable Routing and First Boot
Before closing the side panels, plug in the front panel case headers (power button, reset switch, HD audio, and USB ports) into the bottom edge of the motherboard. Double-check that all power cables are seated flush.
Connect your monitor to the graphics card (not the motherboard video port), attach a keyboard, and plug the power cord into the wall. Flip the power switch on the back of the PSU and press the front power button on your case. If all fans spin up and the display shows the Motherboard POST screen (BIOS prompt), congratulations—you have successfully built your desktop PC!
If you want to know more about computer architecture, client systems and networking hardware, breaking down physical client machines (like desktop PCs) alongside motherboard-integrated network interface devices (Ethernet chips, Wi-Fi modules, and cabling standards), reads Computer Network Components: Devices, Protocols, and Functions
Conclusion
Building your own desktop PC is an empowering journey that bridges technical understanding with practical execution. By systematically working through each component—from placing the CPU in its socket to organizing cable management—you transform individual hardware parts into a high-performance custom computer. Beyond the immediate performance gains, the hands-on experience equips you with valuable troubleshooting skills for future hardware upgrades.
Frequently Asked Questions (FAQ)
1. Do I need an anti-static wrist strap to build a PC?
While an anti-static wrist strap provides extra protection, it is not strictly mandatory. As long as you assemble your PC on a hard wooden table and periodically touch a grounded metal object (such as your unpowered PC case) to discharge static electricity, your risk of damaging components is extremely low.
2. What should I do if my PC turns on but shows no signal on the monitor?
First, ensure your HDMI or DisplayPort cable is plugged directly into the dedicated Graphics Card (GPU) rather than the motherboard’s rear ports. Second, verify that your RAM sticks are fully seated in their slots until the side clips lock.
3. How do I install the operating system on a newly built PC?
Prepare a USB flash drive (at least 8 GB) with an operating system installation tool created on another computer. Plug the USB drive into your new PC, turn it on, enter the BIOS, and set the USB drive as the primary boot device to start the installation wizard.
References
- Fakultas Teknik Elektro Telkom University. (2025). Tips Hemat Bangun PC atau Laptop untuk Editing dan Gaming. Telkom University. (Contact: [email protected] / [email protected]).
- Tel-U Press. (2024). Dasar Komputer: Panduan Penggunaan Software dan Hardware. Telkom University Press.
- Mueller, S. (2022). Upgrading and Repairing PCs (23rd ed.). Que Publishing.
- Hennessy, J. L., & Patterson, D. A. (2021). Computer Architecture: A Quantitative Approach (6th ed.). Morgan Kaufmann.